
Payment and point member | Payment methods | Shipping methods | Warranty policy | Shopping procedure
|
Howdy, this is Ito from the service department. Following the previous issue, I am in charge of the email magazine this time again. For next time Natsume the super part-timer will be in charge of the email magazine for next two weeks in a row. Well I am pretty upset to get in sudden charge of the email magazine. I will write about the contact point cleaning for output relay following my previous writing and about my goofy story a little bit. Sorry I couldn't come up with the topic. Firstly, here is my goofy story. |
|
|
 |
|
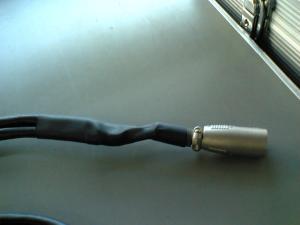
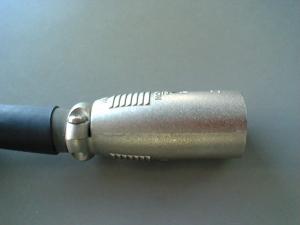
Please take a look at this picture. This is where I was supposed to put a shrinkage tube on to get the base of the CANON terminal for Mclntosh preamp C8 constricted by heat. You may not notice from the left picture though, I made a mistake by neglecting the characteristic of the shrinkable tube. You may notice from the right picture what mistake I made. Since the heat shrinkage tube gets constricted as a whole, all the diameter and length of the tube will change. Then if you fail to pay attention to that characteristic and apply heat to the tube, you will end up with the goofy result as seen in the right picture. I should have put the tube tip on up to the base part of the CANON terminal before it gets constricted, and then I should have applied heat from that part. I used heat from a gas stove since this heat shrinkage tube wouldn't even budge by low heat from a lighter etc. Make the tube constricted with as low heat as possible since the heat from the stove is pretty high. If you apply heat too high, you might end up with the burned shrinkage tube. So please be careful. Well that was my goofy story. After all, anybody can make a mistake if he/she doesn't do the reasonable approach. |
|
|
Now I will talk about the output relay cleaning next. But I think I'd already explained simply about the relay structure and the principle of operation of the relay in the previous email magazine. You will understand more about them with the content of this time, so please read this and the previous issue as well. Anyway let me explain again. I think you have heard the sound like "click" a few seconds later after you turn on a pre main amp or power amp. This means the relay is working. I already explained before that "the relay is electric equipment with the function that identifies the presence or absence, size and other forms of electric energy prescribed beforehand and controls the opening and closing of other electric circuits". In short, the general relay means an electromagnetic relay which is an electric part opening and closing the switch. Anyway I will shut up around here to get to the point. Let's move on to the relay contact point cleaning. |
|
|
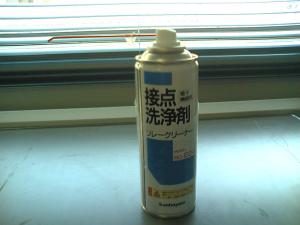
The contact point cleaner I use here is MODEL RC-224 made by Sanhayato. After you spray this, you will hear nice crackle since this cleaner is very volatile. But this has no negative effect after cleaning. The principal component is ethyl alcohol. You may say "So what?" though, some of you who studied chemistry a bit must have learned about ethyl, methyl or whatever. Have u ever wondered why the relay cleaning improves the continuity? |
|
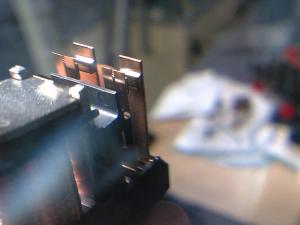
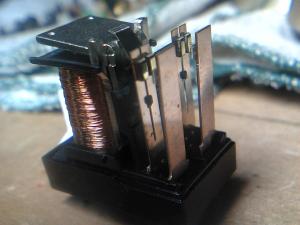
Anyway let's get to the output relay contact connection. I will explain with SANSUI pre main amp (I'm sorry, I forgot the model number.) in the right picture. I explained in the previous email magazine that the deterioration of the relay performance results mostly from the failure caused by sulfuration of the contact point or dust. It may be difficult to see in the picture though, 4 contact points on the front coil side in the picture are traveling contact and two contact points in the back are fixed contact. You can see the fixed contact in the back in the picture is brownish and the gold plating is invisible. Naturally, you can imagine the front traveling contact is like that too. Please look at the following picture. |
|

|
The side of the traveling contact has turned brownish like this, too. You can remove this kind of brownish stains relatively well with a cleaner though, there is nothing to be done with a burned contact. It needs to be replaced with the new one. |
|
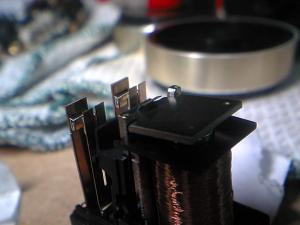
As for the point to be noted for cleaning, it's natural that the continuity becomes poor if the contact point gets misaligned or you don't connect well since the contact point is vital to the relay. In a word, it is taboo to use stuffs with high coefficient of friction such as an abrasive paper for contact point. Such stuffs will grind to the gold plating on the contact part. So please do not use any of such stuffs as much as possible since the contact parts will not interlock and end up with poorer contact point. Some smooth papers like a scratch paper should be ok. Cut the paper into pieces and spray the contact point cleaner on it. And then polish the contact point gently with that paper sprayed with the cleaner. And look at what happened. The gold plating on the traveling contact side is clearly visible to you as seen in the right picture. Can you notice? |
|
|
The gold plating on the fixed contact side is also visible, isn't it? When it's too dirty, it will clean off if you spray the cleaner and blow it off. |
|
How did you like it? Why don't you try cleaning yours? Anyway I need to excuse myself around here this time. I'll see you again. |
|
 Used
Used Consigned
 Hold
Hold Reserved
 Sold Out
-
-

- Company profile
- Privacy policy
- Contact
- Newsletter back issues
- Hi-Fi Do live camera!
- Today's software
- Today's hardware
- New arrival alert system
- Japanese
-
Hi-Fi Do Online Newsletter

-
Payment methods

-
Shipping methods

-
Warranty policy

-
Shopping procedure

-
Hi-Fi Do Record Shops Softs, Audio parts and Tubes can ship overseas.Ordinary,we use EMS but for large order,we use SAL or Surface.For Asia,it cost 1,200JPY/1LP,900JPY/1CD.Please check at the shipping cost table for more detail.

-
Meaning of icons
